


...Because i got some more seeds planted out.
Rutabaga, Laurentan
Beets, Egyptian
Green Bush Beans, Provider
I also got the 7 (of the10 that sprouted) Salsify (Sandwich Island mammoth ) seedlings planted out. There is a long gap between the green beans and the salsify and i was tempted to fill it with something else, but i have to wait until the Brussels sprouts seedlings either come up or not, if they don't then i will put in the Jacob's Cattle beans. They are a good green bean and a good dried bean so i could get a crop of either one or the other if i plant them in the next 2-3 weeks.
I lifted the cover on the melon row, and it was amazingly warm under there! I'd almost say it was hot... i hope not too hot. I didn't have much time to inspect the row cause i had to go in, my "babysitter" was about to go on strike.
The weather is so nice out today. A little 3mph breeze now and then, its about 75F...
Overnight lows forecast:
Tonight 52
Tomorrow 54
Tuesday 57
Wednesday 42
Showing posts with label salsify. Show all posts
Showing posts with label salsify. Show all posts
Sunday, May 23, 2010

Saturday, May 15, 2010
They're off...
Alibi cucumber and the Salsify have already sprouted. Other than that, not much else going on. I was surprised they came up so quickly so i figured i ought to make a note of it.
Rain in the area but it looks like we are going to miss getting it. Things are getting a bit dry. I did some weeding in the flowerbed and saw a snail shell but no live snails or slugs. I don't know if it is the dryness or the snail bait i put down, but either way i am grateful, The sevin dust and the diatomaceous earth mixture i used on the lilies seems to have knocked down those horrible red beetles that ate my plants last year and left gooey black frass on what was left.
I pulled a lot of what i was told was a type of goldenrod out of the garden. I have had it in there for a couple years now, each year trying to remember if it was a weed or a desirable plant and then forgetting what it looked like in the spring when it needed to be dealt with. This is why i blog now.
I bought a copy of "The Countryman's Year" by David Grayson. Found it at Amazon for just under $3, but of course the shipping was still $3.99 , grrrr... But i wanted it and it sounds like something i would enjoy.
I planted the rest of the Graffiti cauliflower last night, in peat pellets. I will keep them inside and see if anything grows. I am now out of them. If they don't grow i won't be getting them again. I thought i'd go easy on myself and buy a type that didn't need to be blanched but maybe it wasn't the best type to get?
Things i need to get going before too long:
Teasel...ornamental
Germander...herbal tea
Roma tomato- i found one last seed hiding in the corner of the seed packet
Rose orach...a salad 'green', red in this case
Cabbage- found a seed packet that should be used up
that's not all, but being climbed like a tree by a cranky 15-month-old is not conducive to list typing and remembering things *sigh*
Rain in the area but it looks like we are going to miss getting it. Things are getting a bit dry. I did some weeding in the flowerbed and saw a snail shell but no live snails or slugs. I don't know if it is the dryness or the snail bait i put down, but either way i am grateful, The sevin dust and the diatomaceous earth mixture i used on the lilies seems to have knocked down those horrible red beetles that ate my plants last year and left gooey black frass on what was left.
I pulled a lot of what i was told was a type of goldenrod out of the garden. I have had it in there for a couple years now, each year trying to remember if it was a weed or a desirable plant and then forgetting what it looked like in the spring when it needed to be dealt with. This is why i blog now.
I bought a copy of "The Countryman's Year" by David Grayson. Found it at Amazon for just under $3, but of course the shipping was still $3.99 , grrrr... But i wanted it and it sounds like something i would enjoy.
I planted the rest of the Graffiti cauliflower last night, in peat pellets. I will keep them inside and see if anything grows. I am now out of them. If they don't grow i won't be getting them again. I thought i'd go easy on myself and buy a type that didn't need to be blanched but maybe it wasn't the best type to get?
Things i need to get going before too long:
Teasel...ornamental
Germander...herbal tea
Roma tomato- i found one last seed hiding in the corner of the seed packet
Rose orach...a salad 'green', red in this case
Cabbage- found a seed packet that should be used up
that's not all, but being climbed like a tree by a cranky 15-month-old is not conducive to list typing and remembering things *sigh*
Monday, March 15, 2010
Photo Tutorials and odd root veggies:
I read quite a few blogs. Normally they are gardening or crafting blogs where the author is constructing some fascinating contraption or modifying something in order to repurpose it. I decided that i am jealous of never having done my own photo tutorial. So, i think today is the day!
So, to set the stage:
I love the seed starting product known as Peat Pellets. They are very convenient. They allow me to sow seeds without having to buy anything but them and the seeds. I can place the Peat Pellets in most every container i want. What works best for me is to save styrofoam meat trays and set the PPs on those. The trays take a Sharpie marker very well and there is plenty of room to write.
But, like i said, they aren't very cheap. I usually buy them by the bag - about $15. for 100.
It saves the work of having to individually fill those rotten 6-pack trays, which always give me trouble, and they are more compact to store than bags of soil.
My mom gave us her Keurig coffee pot a few months ago, the timer on it ceased to function so she was getting a new one. We don't use timers on coffee pots, so it was a good match for us. Now the one-cup system always sort of bothered me, i'm not an environmentalist- really. But the one-use plastic cup just kinda irked me even though i absolutely adore the brewing system.
Being the seed-starter than i am (i'm a better seed-starter than a gardener, big plans, bad luck, little follow-through) i pretty quickly realized that they were about the same size as my peat pellets. And better, by function, they already have a drain hole precision- punched into the bottom. All that needs to be done is to remove the lid, the grounds and a quick rinse. This is a project that is well within my skill level.
So i saved the K-cups over a number of months (about 130 saved), disemboweled them and set them aside (much to my hubby's annoyance) until around now.
Here are the Disemboweling instructions for making the Keurig K-Cup into a little pot for seedling propagation.
 This is a K-Cup. Recently used. Its good to clean them out shortly after they cool off or else things get a bit scary in there.

Perfect seed-starting size.
 Break the foil lid and peel it off. It is a little harder to pull off than usual foil tops because these are not really made to be removed.
 It dosen't take very long even though it might separate into a few pieces, the cup is tough enough.
 Now, dump out the coffee grounds. They stick to the mini filter, but that is ok. Usually i dump the grounds into a bowl (when i do 20 kcups at a time) and feed them to my worms.

Then i poke my finger through the center of the paper filter, hook it and yank, peeling it away from the edges.
 Dismantling complete.
 I don't even have to poke a drainage hole.
 Just a quick rinse...
 Don't even need to use soap.
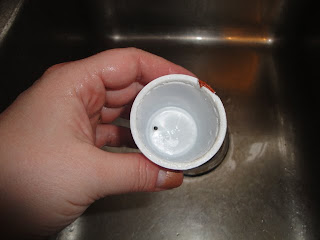 All clean and ready to be filled with potting soil.

The white cups are best because they take a label so well. They also come in black plastic, but i only use those if i must.
 They fit 50 to a standard flat, just like the Peat Pellets, and if you drink the coffee anyway, they are technically free.
Yay! My first tutorial. LOL
So, you see, it is pretty simple :)
I spent some time looking up some info on growing a couple of the unusual root vegetables that i want to try this year.
Burdock is one of them.
Apparently it is quite good, shows up on cooking shous occasionally and is said to be loaded in good vitamins and minerals. Its downside is that the roots can grow about 3' long, can get quite large around and are tenacious- so harvesting them is challenging!
But i came upon an ingenious idea for making the harvest much easier- if not the prep work:
The Salsify seems pretty straightforward, they are like thinner, foot-long carrots. But i learned that the foliage can also be eaten since salsify is related to the dandelion.
So, off to read a couple more gardening books. "Cash from Square Foot Gardening" and "Garden Encyclopedia". The Cash book is basically the original "Square Foot Gardening" book, but with extra tips for making it a backyard business... not terribly interested in that- though i hope to be getting enough produce to both donate (and not just tomatoes and zucchini) and put away, bit it was the only square foot book we coulf find for free on the internet.
The Garden Encyclopedia is full of info, as it should be. It even has a section to help me decide how much of each item to grow- production estimates. This will keep me from getting carried away and planting too much of one thing and barely enough of another- while allowing for the plans to preserve.
Between the two books, i am being reminded to also stagger the planting of multi-harvest crops, like lettuce, cabbage, radishes and bush beans, so i don't have them all coming to bear in one week, but that we have one or two harvestables at a time.
More reading, graphing, planning, calculating and thinking. Yay!
During the little one's nap today, i hope to get the onions, shallots and welsh onions (similar to chives) started and set outdoors with the other wintersown flats.
So, to set the stage:
I love the seed starting product known as Peat Pellets. They are very convenient. They allow me to sow seeds without having to buy anything but them and the seeds. I can place the Peat Pellets in most every container i want. What works best for me is to save styrofoam meat trays and set the PPs on those. The trays take a Sharpie marker very well and there is plenty of room to write.
But, like i said, they aren't very cheap. I usually buy them by the bag - about $15. for 100.
It saves the work of having to individually fill those rotten 6-pack trays, which always give me trouble, and they are more compact to store than bags of soil.
My mom gave us her Keurig coffee pot a few months ago, the timer on it ceased to function so she was getting a new one. We don't use timers on coffee pots, so it was a good match for us. Now the one-cup system always sort of bothered me, i'm not an environmentalist- really. But the one-use plastic cup just kinda irked me even though i absolutely adore the brewing system.
Being the seed-starter than i am (i'm a better seed-starter than a gardener, big plans, bad luck, little follow-through) i pretty quickly realized that they were about the same size as my peat pellets. And better, by function, they already have a drain hole precision- punched into the bottom. All that needs to be done is to remove the lid, the grounds and a quick rinse. This is a project that is well within my skill level.
So i saved the K-cups over a number of months (about 130 saved), disemboweled them and set them aside (much to my hubby's annoyance) until around now.
Here are the Disemboweling instructions for making the Keurig K-Cup into a little pot for seedling propagation.


Perfect seed-starting size.


Then i poke my finger through the center of the paper filter, hook it and yank, peeling it away from the edges.


The white cups are best because they take a label so well. They also come in black plastic, but i only use those if i must.

Yay! My first tutorial. LOL
So, you see, it is pretty simple :)
I spent some time looking up some info on growing a couple of the unusual root vegetables that i want to try this year.
Burdock is one of them.
Apparently it is quite good, shows up on cooking shous occasionally and is said to be loaded in good vitamins and minerals. Its downside is that the roots can grow about 3' long, can get quite large around and are tenacious- so harvesting them is challenging!
But i came upon an ingenious idea for making the harvest much easier- if not the prep work:
From one of our customers, W. Takahashi:I think its brilliant. Hubby just sees it as more work. I'm wondering it it might be worth it, its a great idea but i don't know if it will ever happen, to be honest. But at least i know the best way to do it if ever!
I have a tip for growing Gobo without the intense digging normally associated with gobo. I start seeds early inside on a hot pad (Zone 5). Garden prep: Cut 4" PVC into 36" Lengths and then in half lengthwise. Bury the PVC starting 2"-3" deep at surface and the deepest end at 12" (at a cant). I plant the seedlings at the top end, positioned to ensure roots will follow PVC, keeping plants watered & fertilized. Once established, I mulch heavily with straw. I normally overlap each PVC with a 15" spacing of the plants requiring harvesting from the last plant first. Harvesting requires minimal efforts. Source
The Salsify seems pretty straightforward, they are like thinner, foot-long carrots. But i learned that the foliage can also be eaten since salsify is related to the dandelion.
So, off to read a couple more gardening books. "Cash from Square Foot Gardening" and "Garden Encyclopedia". The Cash book is basically the original "Square Foot Gardening" book, but with extra tips for making it a backyard business... not terribly interested in that- though i hope to be getting enough produce to both donate (and not just tomatoes and zucchini) and put away, bit it was the only square foot book we coulf find for free on the internet.
The Garden Encyclopedia is full of info, as it should be. It even has a section to help me decide how much of each item to grow- production estimates. This will keep me from getting carried away and planting too much of one thing and barely enough of another- while allowing for the plans to preserve.
Between the two books, i am being reminded to also stagger the planting of multi-harvest crops, like lettuce, cabbage, radishes and bush beans, so i don't have them all coming to bear in one week, but that we have one or two harvestables at a time.
More reading, graphing, planning, calculating and thinking. Yay!
During the little one's nap today, i hope to get the onions, shallots and welsh onions (similar to chives) started and set outdoors with the other wintersown flats.
Subscribe to:
Posts (Atom)